For all of you yearning for more tutorials, today's a happy day! A matchbook tutorial!


While I'm not a Valentine's Day person (possibly for cultural reasons - it's just not the same kind of celebration here in Finland), I'm definitely a person who sees the point in treating your someone special to something special. And because I'm usually not a lovey-dovey mushy person, I'm also not a heart person. Unless we're talking about actual hearts. And there you have it - I found out I can do non-icky Valentine's Day stuff as long as we go instead with that magnificent beating organ keeping us alive (and hopefully loving) every single day of our lives.
So, today I'm happy to present you with a detailed tutorial for putting together your very own heart matchbook, or, actually, five! I made you a free printable for the covers, and since you can fit five covers per page, it only makes sense to make five! These little books are quick and easy to make and require very little special tools (and you can improvise many things if you're lacking something listed below), and only a few sheets of paper for the entire lot.
I've used this matchbook style for my books of good things for a decade now, and I still think it's the bee's knees. These small things are just so full of cuteness, and once you've got the hang of it, you can whip up a bunch in a flash! Super rewarding!
I know you're itching to get started, so let's have a look at the stuff you need to make these books happen:
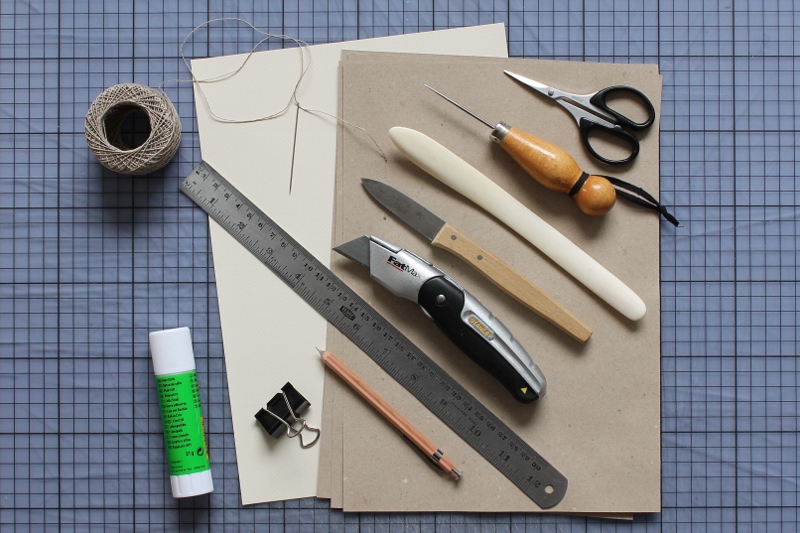
Materials & Equipment
- light-coloured heavyweight paper - 1 A4 sheet for 5 books (I used 160gsm Canson Mi-Teintes)
- paper for the pages - 5-10 A4 sheets with short grain direction* for each book (the number of sheets you need depends on the thickness of the paper - I got away with just one sheet per book, but you may need more if your paper is thinner)
- thread (I used natural linen thread)
- a glue stick (or pva+time&patience)
- a piece of random scrap board and some waste paper
- a metal ruler for measuring and cutting
- a sharp knife for cutting (along the lines of a mat knife or a scalpel)
- a paper knife for tearing (I use a bookbinder's knife, but a sharpish dinner/butter knife will do in a pinch)
- a bone folder for scoring (if you don't have one, use something pointy & not sharp instead - a knitting needle, a blunt knife...)
- an awl for punching holes (at your own risk: use a thick needle or a nail instead - you'll most likely end up hurting your fingers a bit)
- scissors for cutting thread
- a needle for sewing
- a binder clip to make your life easier
- a pencil for marking
- a cutting mat or a piece of waste board to cut on
- a (colour) printer for printing the covers
* The grain direction is super important in all bookbinding, but this time it's especially important you get it right. This book is so small that if you use long grain paper for the pages it's going to be a pain to open the pages enough to write on them. And if you use short grain paper for the covers, it's going to be stiff and ugly. You don't want ugly. Most A4 sheets have long grain, so if you can't find short grain paper for the pages, grab some larger sheets and cut some yourself (A4 measures 210mmx297mm) - it's worth the extra hassle!

- First things first: print your heart covers.You can download the printable pdf here. Remember to print the pdf on A4 paper in actual size! That means no scaling, no fit to page, no nothing - print actual size (and preferably in high quality). How that works in practice depends entirely on the software and the printer you're using, but it's usually not at all complicated (but then again, sometimes it is - our laser printer worked like a charm with just a few clicks of a mouse, but my Epson XP-960 made me jump through all kinds of hoops before I found the magic solution = print borderless->settings->retain size).
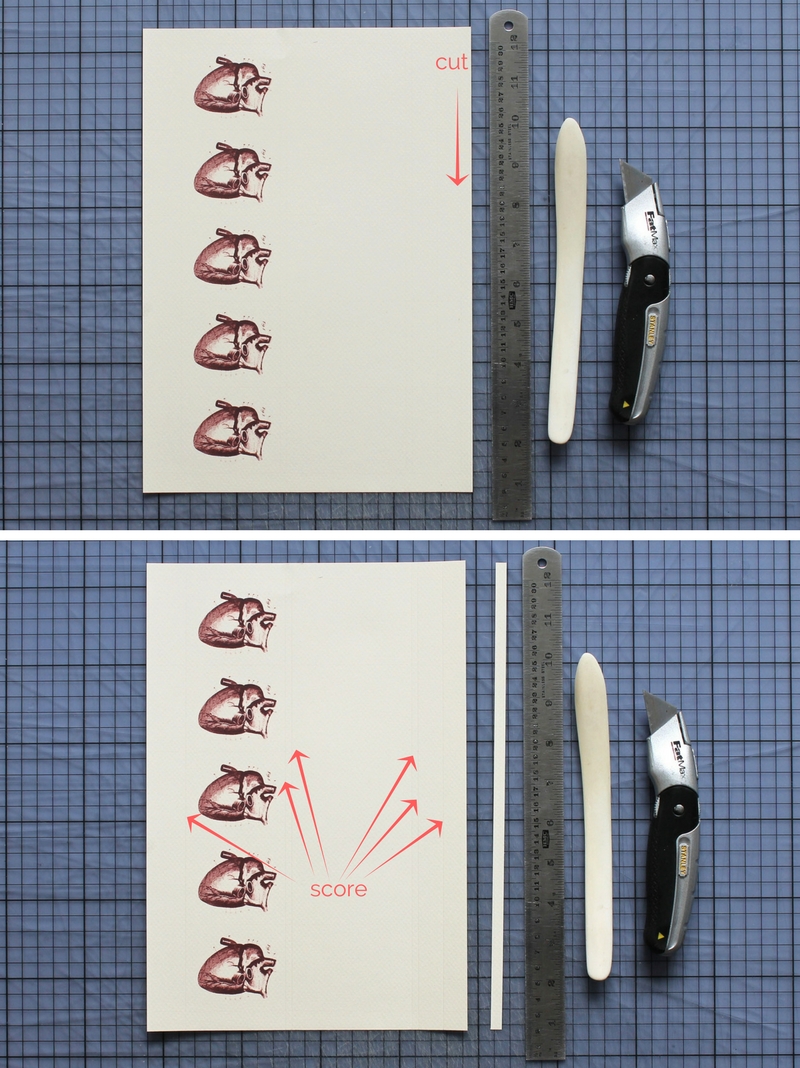
2. On the printed page there are five hearts and several light-coloured lines. I know the lines may be hard to see if your paper is darker (or your printer is not so great, like mine), but this way you needn't worry about any of the lines being too visible on the finished book. If needed, add some temporary pencil marks to help you see the lines while you work. If you place the paper as in the above photo you should have one vertical line on the left side of the hearts, and six on the right.
First, cut along the last line at the right edge of the paper using the metal ruler and knife - that's the only cut you make in this direction. Then, use the bone folder and ruler to score along all other lines in this direction. Scoring helps you fold the paper neatly and exactly where you want it to fold.

3. Fold along the outermost score lines and glue down the flaps you just created. Give the flaps a gentle rub with your bonefolder to make sure they adhere well.
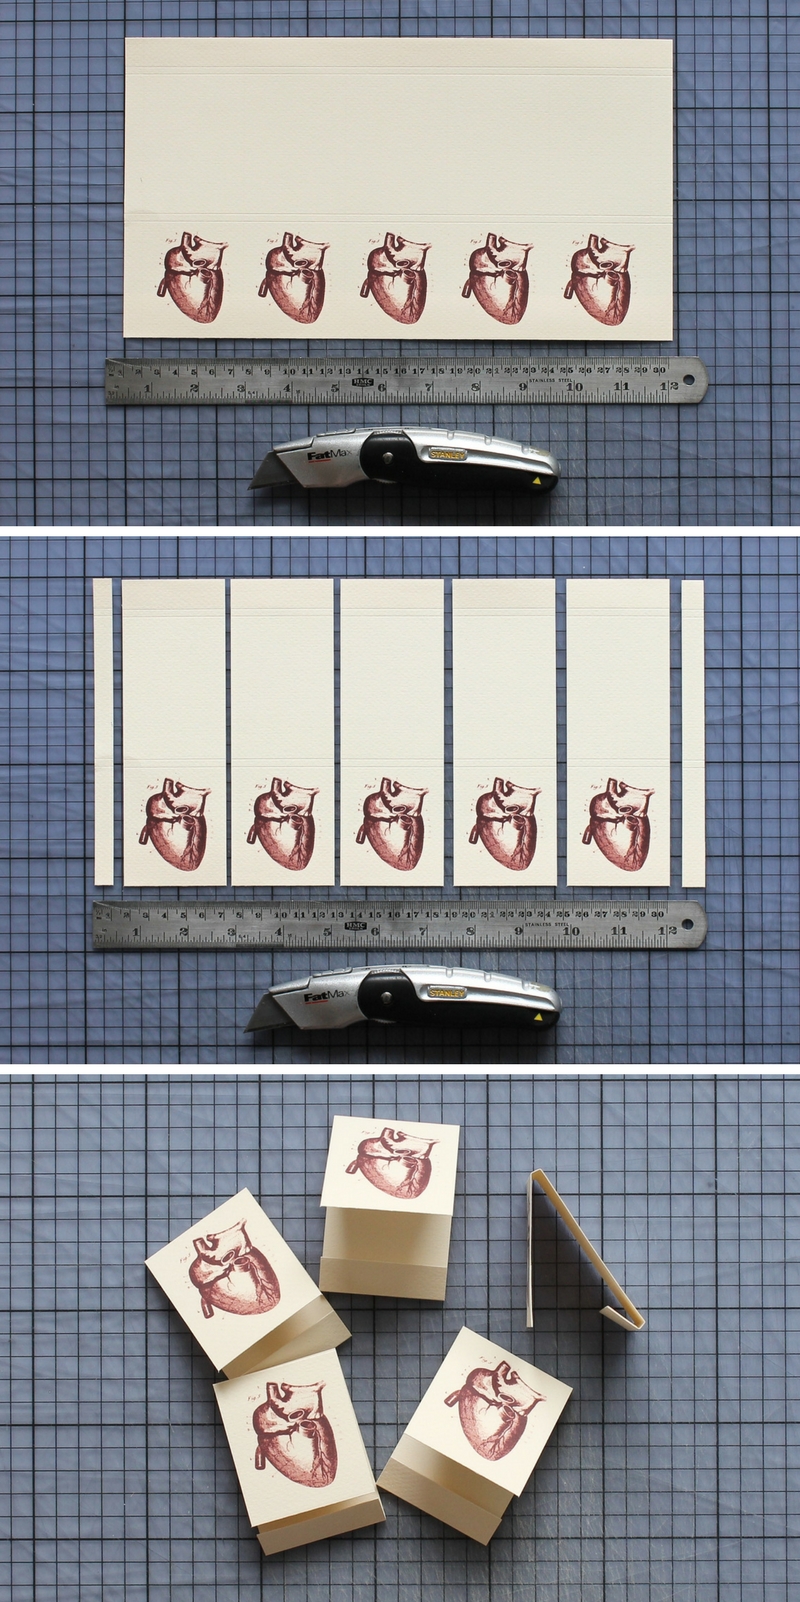
4. Cut out your five covers and fold them along the score lines.

5. Use one cover to create a template for punching holes. On the inside of the smaller flap, mark lines at 6 mm from the short edge, at 5 mm from the first line, and at 10mm from each side. Use your awl to mark holes at the intersections of those lines. Use a piece of scrap board to protect your cutting mat (or work surface) as even self-healing cutting mats do not take kindly to puncture wounds.

6. Flip your template cover around and use it as a guide to punch holes on the flaps of all remaining covers.
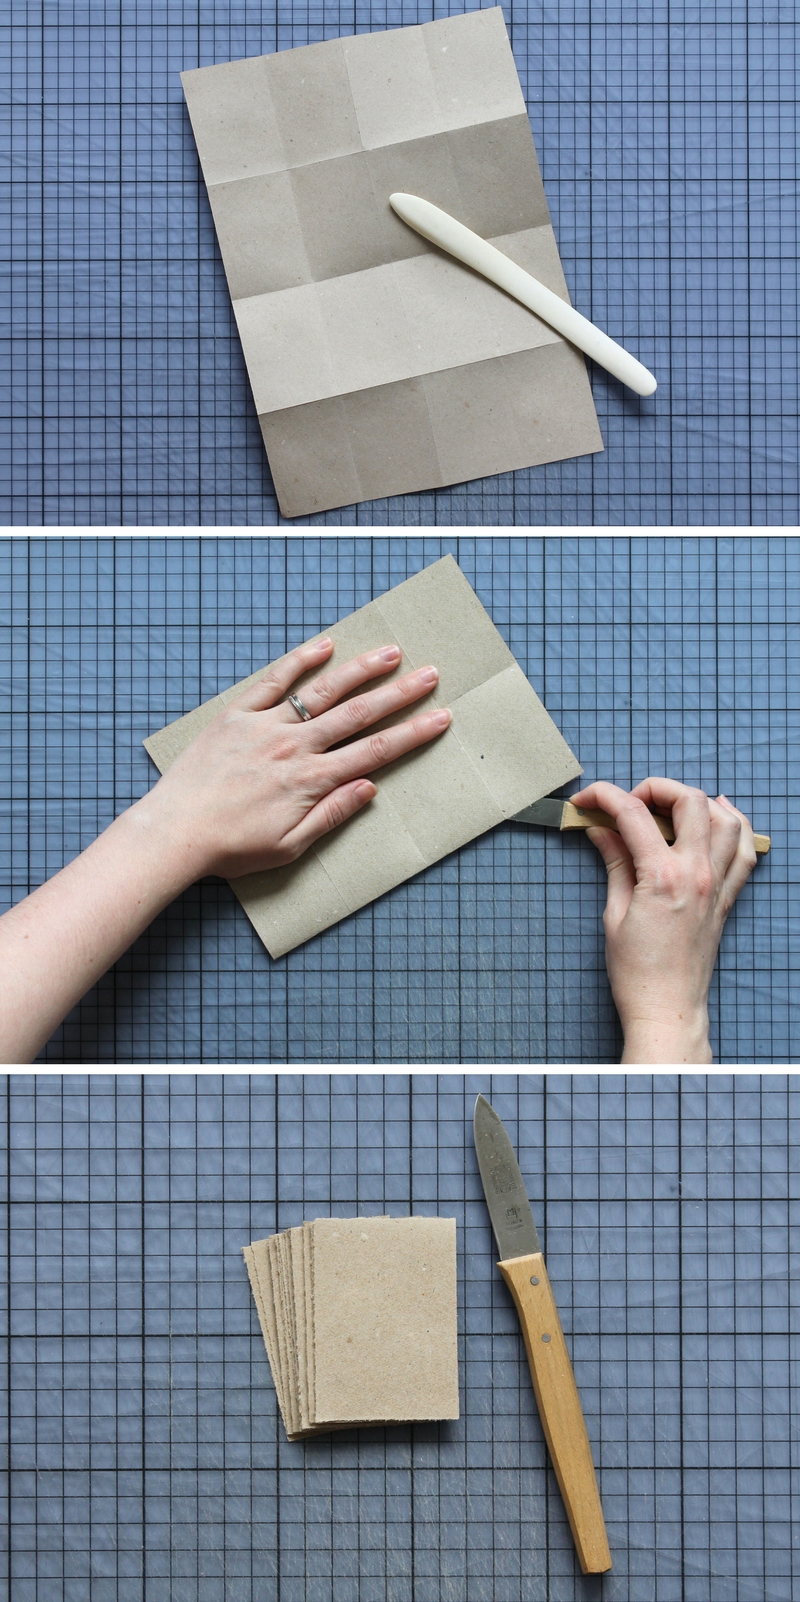
7. Pages! Finally! Fold your paper into quarters length-wise and width-wise. Use your paper knife to tear the sheet into 16 loose pages.
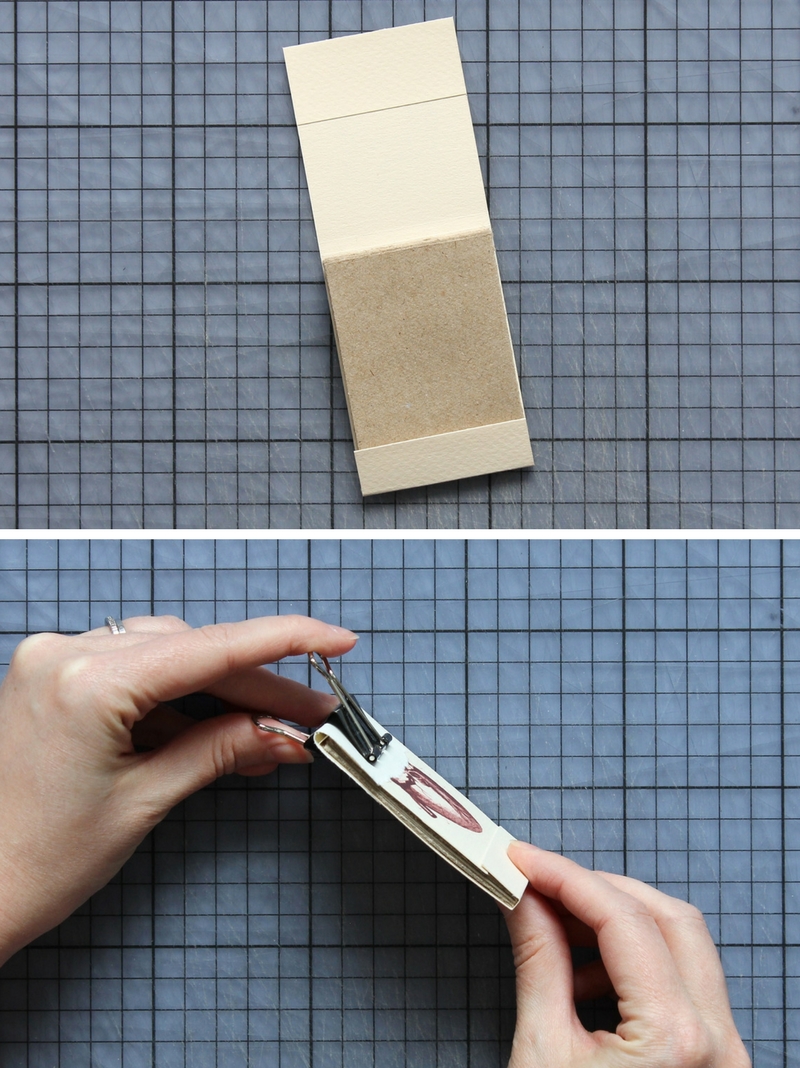
8. Take your stack of pages and place it inside the covers. This is the time where you find out how many pages your little book needs - my 16 pages of recycled paper were enough to fill the thickness of the covers (big surprise here: the cover measurements were tailor-made to be used with this paper), but if your paper is thinner, fold and tear more pages as needed. Once you have enough pages for each book you plan to make - take one stack and place it in its covers. Use a binder clip to keep everything aligned - I like to place a piece of folded scrap paper between the clip and the book to prevent the clip from possibly marking the cover.

9. With your awl, punch holes through the whole stack of covers and pages. Remember to protect your cutting mat with that scrap board and keep the awl as vertical as possible as you press down on it. If your thread is on the thicker side, wiggle the awl around a bit to make the holes large enough for your needle and thread to pass through.

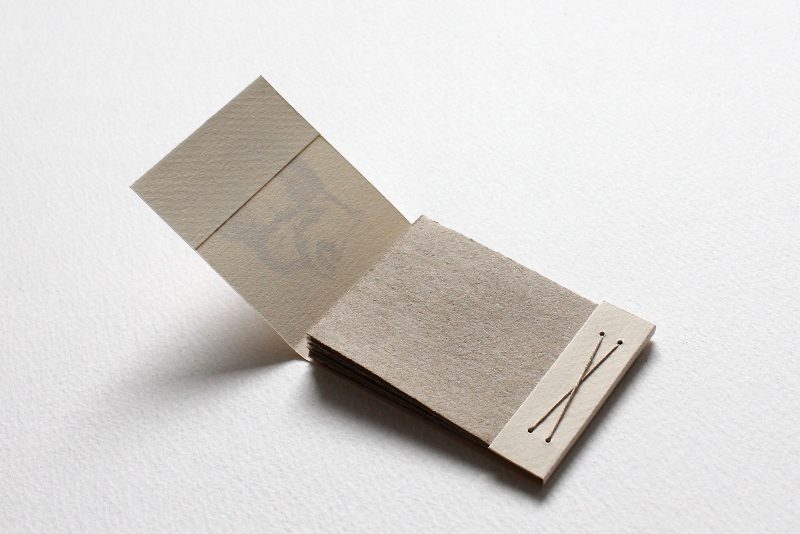
10. Starting at the back cover, stitch a simple X across the front. Tighten the stitches and tie off the thread with a square knot. If you're unsure of your knotting skills, or if your thread is slippery, add a dab of glue to the knot to be on the safe side. Cut thread ends.
11. Repeat from step 8 with the remaining books, and admire your handiwork!

Now, go and make a big batch for Valentine's Day!!! Hand them out as blank jotters to your friends, or fill the pages of that one special book with sweet words of love - write a list of the best things about your sweetheart, jot down some of your favourite quotes, pen a unique marriage proposal... Just a suggestion... Wouldn't be the worst marriage proposal in the world...
Any ideas of what you'd like to write in your own tiny heart matchbook? Who'd you give it to? Would you be selfish and keep them all to yourself? (Not blaming you for it, if you did.)
***Please, please, please note this matchbook tutorial and printable are for personal use only. Make as many matchbooks as you want for yourself, or to give away as gifts, but commercial use is not okay. Feel free to share a link to this tutorial wherever you want (in fact, please do!), but don't copy or reproduce it in its entirety, or use it as a handout in workshops you teach. Thank you!***